


No space for a tree? No problem!
Every year we create a space saving Christmas tree, last year it was in the form of shelves, and the year before that it was made from plywood and string lights… This year, it’s all about using something that you can find just about anywhere – fallen tree branches! Not only is this a great use of resources (foraged is best, after all) but it’s an incredibly easy and rewarding project to make. This is another DIY in collaboration with Asia Miles, who are all about having a rewarding Christmas, which for me means making and creating. Read on to learn how to make this DIY Branch Christmas Tree.

DIY Branch Christmas Tree
I found these branches on my regular morning walk. I got mine all at once and looked a bit crazy wandering down the street with big long branches, but you can also just pick up whatever you an find over a few days. Straight, dried out branches work the best!
Materials

")
2
Then, start breaking your branches into the right size, going from smallest to biggest.

3
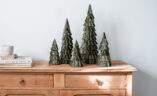
Move them around until you are happy with the spacing between them. We went with 5 branches for this tree, but you can use as many as you like depending on the size of tree you want. I would suggest choosing an odd number (i.e. 5,7,9 etc) rather than an even one as this looks better.

4
Start to glue the rope and branches together, beginning at the bottom to top. Using your glue gun, hot glue the rope to the back of the branch. Then wrap the rope around, putting another dot of glue to secure it in place.
")
5
Your finished tree should look like this! Note that at the top we are going to put a star, which is why there isn't a branch at the very top.

6
The next step is to hang it on the wall. We used a wall hook to do this, and then stuck a star over the top to cover this.

7
Finally, it's time to decorate! We used a long set of string lights to outline the tree and then cover each branch. To that we added paper tree decorations, stars and can hanging balls. Simple!


Enjoy!


This post is in collaboration with Asia Miles.


