


Cute kids project incoming!
Recently we put the girls into the same bedroom, and created a playroom in the spare room. There’s a blank space in the corner and I wanted to add an art desk where the two of them could colour and paint. The only problem is that most children’s desks are made from bulky plastic, have little to no storage and just aren’t very cute. So of course, I had to make one that checked all my boxes!


Materials You Need:
- 3 Drawer Chest (I found one of Facebook Marketplace)
- MDF Piece (1830 x 915 3mm)
- Peg Board (1220 x 915 4.8mm)
- Pine Panel (620 x 500) (I used this one and just cut it to length)
- Pegs (5 x 75mm)
- Screw Driver / Screws
- Liquid Nails
- British Paints H2o Enamel Semi-Gloss in Mossy Road and Perfect Timing
- British Paints Prep 4in1 Water Based
- Paint Brush / Rollers
- Frog Tape
- Jigsaw
- Kethy Pinta wooden handles.


How To Make An Arched Kids Craft Desk:
1
I began by using my jigsaw to cut out an arch that matched the size of the drawers, and also cut a top that fit to make a desk, and long MDF to form the arch.

2
Once I had all the pieces cut to length, I glued the peg board to the back of the chest with Liquid Nails and then glued the pine panel to the top of the chest as the desk’s top.

3
Once the base of the desk was assembled, I attached the MDF to one side of the drawers then pulled it around, carefully bending it to attach to the other side and create an arch.

4
I screwed it into the side, and used some glue to attach the pegboard arch to the arch. I added another piece of MDF to go down the sides of the drawers and used filler to disguise the joins and the screws.

5
Once the whole piece was ready, I used British Paints Prep 4in1 as a baecoat, it is a primer, base coat, stain blocker and sealant all in one, and it made this whole piece look so great.

6
It was a little bit tricky to decide on the final colour palette for this, but in the end I opted for a potting shed inspired palette with a stripe.

7
Once the prep work was done I painted the entire piece with this gorgeous ‘Mossy Road’ green by British Paints.

8
Because this piece was for my girls, I decided to add some pink stripes to brighten up the piece and make it a bit more playful for their bedroom.

9
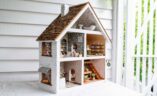
After painting over the tape, to ensure crisp lines, I removed the tape after only a few hours. I then added accessories to the pegboard including some small boxes. I also added cute handles!


I’m so happy with how this turned out and my girls are absolutely obsessed. It’s the perfect creative space for them to do their arts and crafts with enough storage to keep all the supplies in the drawers.
Find more DIY’s for kids rooms below.
This project is in collaboration with British Paints.

