


I’m not really sure why I decided to do another dollhouse right before Christmas after last year’s trauma but honestly, I couldn’t resist!
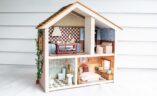
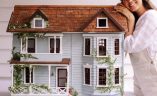
I found this old dollhouse in the Mullumbimby tip shop and I knew Bobbie has wanted one side we gave last year’s one to Frankie, so I decided to do it! I wanted to do something different so in the end I used this inspiration and decided to make it a cafe, plant shop, book store, craft store and on top a little bedroom that the dolls live in. Kinda the life I’d like to manifest for 2024! Overall, what I wanted to test out if whether it’s possible to create a beautiful unique feeling dollhouse using a relatively basic one as the base. And I can confidently say yes it is!I’m going to be sharing lots more about this but in the meantime, here is the before and after of this project. If you’re planning to do something creative this year and don’t know what yet, may I suggest a dollhouse? It will make you completely insane but you’ll be happy with it in the end.
Keen to learn more about dollhouses, you need to check out my new dollhouse course!

The Process
Basically I did this dollhouse in 3 stages – exterior, walls and floors and then all the furniture and decor. It was quite chaotic to do in under a week! For the exterior, I made bricks using cork which I glued on in a brick pattern and then painted white, and then used popsicle sticks to create shingles for the roof. I didn’t think either of those things would work and I was so blown away when they did! Honestly it looked like a real little building immediately. I then used scrapbook paper to wallpaper the walls, and I used a bunch of different techniques to create the floors. Finally, I made lots of the furniture and decor by hand, and that was seriously such a fun part of the whole process.
Before & After


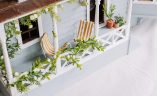
The Plant Room
In the plant room I used thin adhesive backed cork to make herringbone patterned ‘brick’ inspired floors. I also added floral wallpaper to the walls. I made shelves and a rustic bench using stained balsa wood, and also made a ladder out of skewers which I hung from the ceiling. The best part was making the plants and plant pots which I created using corks and faux plant sprigs. I then added a few items I had purchased including a tiny cash register, watering cans and baskets.


The Cafe
I love the cafe, and I think it’s the space that the girls are drawn to the most. I started by making checkered ’tiles’ out of painted card, and then did blue floral wallpaper. Then I made a tiny little tiled coffee counter, first making the base out of balsa wood and then adding tiny Mandala tiles which I grouted. I then made some extra furniture for the space including a bar table, pastry cabinet and runner rug using twine. I also added a little coffee window, and I used my Cricut to make a striped scalloped awning with iron on ‘COFFEE’ lettering. I bought a few things for this space including a pour over coffee stand, coffee cups and pastries.


The Book Shop
I love this little space! When I made the roof I stained way too many jumbo popsicle sticks but I was able to use lots of them through the process of the rest of the dollhouse – I used them to make the floors in this room, and then I added mustard wallpaper. I made the furniture from scratch including a little book display table, green upholstered stool (it was meant to be a tub chair but the back was too small when I made it) and all the shelves. I added a rug made from twine and then made a whole bunch of teeny tiny books including some I had a read and some of the girls faves. I added a gallery wall and also some Cricut vinyl lettering on the walls.


The Craft Room
For the craft room, first I made tiled floors using patterned paper which I laid onto thin adhesive backed cork. I then used green floral wallpaper on all the walls. The focal point of the space is the arched craft shelves, I used my Cricut to make those out of thin wood. It took a few turns to get the maths right but it turned out to be relatively easy to do. I made a trestle table using balsa wood and then added in lots of little craft supplies I made including balls of wool, spools of fabric, tiny paint brushes and tiny jars of paint. I added in a few things I bought to this space including a toolkit with mini tools, a large vase and a basket.

The Attic Bedroom
The final space in the dollhouse is a tiny attic bedroom for the dolls to live in. I made whitewashed timber floors using those jumbo popsicle sticks, and added butterfly wallpaper. I bought a gorgous little wrought iron bed for the room, along with a porcelain bathroom set. I made a bedside table out of a cork and a round rug using some fabric. This is such a cute little room!


There you have it. The life I want and will probably never have! But a girl can dream righ? This has been both the most enjoyable and traumatising thing I’ve done in a while, but if not me then who? I’m really just so happy to have been able to turn a fairly basic dollhouse into something so fun! Stay tuned for more info on how I did all the things in this dollhouse.
