


Honestly, this project just makes my heart soooo full!
It’s Frankie’s birthday this month and also #DIYJuly so we decided to launch headfirst into a super fun bedroom project for her! I roped Ben into helping me and of course he came up with the coolest design, now we just have to make it 😆. We got everything we needed for this project from Bunnings, and although it’s a more detailed project than some of the ones I’ve done in the past, I’m so excited to see it come to life.

A note about safety
One thing we were really aware of when designing this project was the recommendations around safety, we used the Australia Standards as a guide for this project so if you’re planning your own it’s a good idea to review them, or check for applicable safety guidelines or design standards in your country.
before & after


Building The Structure
For this project I was initially thinking it would be a simple hack or upcycle of an existing bed, but I looked at what was around and found most things to be unreliable or expensive. Ben suggested we could probably make something ourselves from scratch for less than a basic bunk bed set up, so of course I jumped at that. He put together a really sweet design and then we built it. We used simple timber framing from Bunnings. Here’s how we did it!
- First we cut the timber framing based on Ben’s design, then we marked out the position of the fixing points, then we drilled a 22mm circular recess into the fixing points on each side of the winter using a spade drill bit, to allow for recessing of the bolts and washers.
- Then we drilled holes for the bolts, and then bolted it together. We bolted together one long side first and then attached it to the wall, then assembled the other long side.
- We erected both long sides and then added in the crossbeams in between to fill out the bed structure.
- The next thing we did was add in the bed base, you can use slats or timber for this.
- We then built the staircase which took a while to get right – Ben said it was going to be the most tricky part and it was!
It was a very simple process but I know that’s down to Ben’s design and how much thought he put into it.
Adding The Details
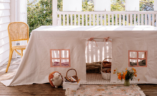
Once the structure was built, on its own it looked quite utilitarian and I knew it needed a lot of details to give it a really amazing treehouse feel. At this point I spent like three days pondering the idea of adding in a huge tree underneath to really give the feel of a treehouse, and I honestly went around and around about that idea! It’s so funny with DIY, you sometimes get fixated on something specific but in the end Ben said it might be better to build a reading area and pull out storage bins instead, which I agree works so well! To give that camp style detail, I used some canvas drop cloth to sew a set of awnings and sails which I think immediately made it look and feel so fun – like an actual tent! We also used the same drop cloth to line the walls of the bottom of the structure to give it a camping vibe, and also to hide the power sockets that were there. While I was sewing and decorating, Ben added in some shelving on one side to create the bookcase, and then on the other side he added in a desk with some pegboard as the backing. He also added in the storage behind the stairs with pull out bins for toys etc, and some lighting using some simply festoon lights attached to the underneath of the structure.
Decorating
One thing I was excited about since the start of this project was to decorate the space! Honestly, I just knew that would make it so amazing.
The Rug
I wanted to soften the floor so the girls could play and really use the spaces, but obviously it wasn’t possible to lift the structure to place a rug underneath the whole thing. Instead I needed to find two rugs that would sit inside the two spaces at the bottom, which was quite tricky! Finally, I got the nerve to cut the original rug from the space in half (!) and I was so happy when it fit perfectly. I simply used webbing fabric to rehem the edges of the rug, because it started to fray immediately!
The Reading Nook
For the reading nook, I wanted a really comfy space so the first thing I did was construct a backrest, which I made using MDF, foam and some secondhand fabric I sourced from the Salvation Army. I simply upholstered the foam and MDF into a backrest and used heavy duty velcro to attach it to a piece of timber running along the back. I used some salvaged leather I had (from this project) to add some leather details to the backrest design. I then added a bunch of comfy floor cushions.
Mushroom Ottoman and Stools
Throughout this whole project I really loved the idea of integrating mushrooms into the design – Frankie just loves them (blame it on Smurfs) and I find them quite fun and whimsical, so I decided to add them in with some decor. I first made some smaller ones using cardboard tubing and placemats with foam on top, both of which I upholstered with boucle and glued together to make them soft and cute. For the storage ottoman, I actually grabbed a Bunnings bucket which I wrapped in foam batting, and then upholstered in a secondhand blanket. To make the top, I took an old pine round, and layered foam on top. I cut the foam so it had a rounded top and then upholstered that using batting and the blanket. The top easily stayed on the bottom of the mushroom so I didn’t need to add anything more to it, I could just stack them together. Funnily enough Frankie loved this piece the most, she keeps all her treasures in there.


