


There’s something about giving a tired old piece a new life that gets me every time.
During the whirlwind that was our ‘renovate the house in a week’ challenge (yes, with a TV crew that arrived just shortly after!) I wanted to prove that even the most overlooked furniture could become a statement piece. And this time it was a secondhand shelf that caught my eye. I found it for $10 and it was wobbly and with the usual orange varnish. But as always, everything has potential! I decided to turn it into a TV cabinet. Using some tiles from Johnson Tiles this shelf quickly became one of my favourite transformations yet!
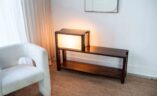
Before and After


I picked up these shelves secondhand and although the top was ruined, the structure was sturdy and perfect for a makeover. I could see straight away that it had the right mix of open and closed shelving at the bottom, ideal for a TV cabinet. My plan? To tile the top and shelving with Johnson Tiles’ beautiful barn red tiles to create a sculptural, statement finish. I’d never seen a tiled cabinet before, and I couldn’t get the idea out of my head.
Materials
- A secondhand wooden shelf or cabinet
- Johnson Tiles Spectrum 97mm x 97mm tiles in Barn Red (gloss finish)
- Tile adhesive (I used Davco Tile Glue)
- Powder grout (I tinted mine with burgundy paint for a perfect colour match)
- Tile spacers (3mm)
- Sandpaper or electric sander
- Drill and screws (optional)
- Paint or sealer for finishing the timber
- Cloth and grout float
How to tile a tv cabinet
1. Start by removing or replacing any damaged areas. The top of mine was warped and water-damaged, so I cut off the entire surface. Give the piece a good sand to remove old varnish and smooth out the surface. If your piece isn’t perfectly flat, screw a thin sheet of MDF on top, this gives your tiles a flat surface to stick to.
2. Lay out your tiles before gluing to check spacing and fit. My Johnson Tiles pieces were the perfect size they fit evenly across the top without needing to be cut, which felt like fate. I used 1.5mm spacers to help keep the lines consistent.
3. Using your tile adhesive (I used wood glue for these), glue the tiles down carefully, pressing each one firmly into place. Work in small sections so the glue doesn’t dry too quickly. Once everything’s in position, let it dry completely (overnight if you can).
4. Mix your grout according to the packet instructions. I used powder grout and added a small amount of burgundy paint to tint it. It creates a seamless, professional finish that blends beautifully with the tiles.
5. Apply the grout with a float, then wipe away any excess with a damp cloth once it starts to set. When the grout dries, buff the tiles gently with a dry cloth to make them shine.


Tips for your own tiled furniture project
- Choose tiles that fit your surface evenly. Try to avoid cutting where possible, it looks cleaner and more intentional.
- Check weight. Tiles and grout add weight so make sure your piece is sturdy enough to handle it.
- Use coloured grout. It’s a small detail that makes the whole design feel elevated!
- Let the adhesive and grout fully cure. It’s tempting to style immediately (guilty!) but waiting a day or two ensures everything’s solid.
Try it yourself
If this project has you feeling inspired, you can get started right away. Comment “mosaic” on my latest Instagram post to get a link to the Johnson Tiles Spectrum Selection Box — a curated tile sample kit to help you play with colours at home. And if you’d like to learn how to create your own tiled designs, check out my mosaic course at Geneva’s DIY School!


