


Hey you guysssssss. Thanks for all your fun advice and ideas about our renovation, you’ll be happy to know that things have been hap-hap-happening!
I wanted to share with you a few process pics of the renovation, I’m not sure if this interests you (maybe you’re all about the afters rather than the befores) but I wanted to anyway. You guys know how much I love the process! I have to say that while this has been a lots of fun, it’s also been a lesson in being decisive (not one of my greatest skills). Turns out that renovating is pretty much a continuous decision-making process, in which delaying the decision adds time to the build so everything is just go go go. That said, this pressure is just what I need because if allowed I would probably takes ages to decide everything, and want to workshop it with you guys for a month. Anyway, in this post I’ll give you a rundown everything that’s been happening! Head here if you want a refresher on our renovation plans.

Behind The Scenes At Our Renovation: Watch the video
I’ve so enjoyed capturing the behind the scenes of the project on video (and getting on film lots of DIY projects you can do in your own home – more on those soon!), but in truth, that means things have taken a bit longer to put together than usual. Hoping to hone my skills a bit more and get a bit faster at this process! Anyway, feel free to tune into the reno on the video below. As a side note, this is a much more candid/vloggy style video than what I usually do, do you like? Or do you prefer something a bit more produced? Not used to seeing my face so close up!
The Front Of The House
Lots of you were very very invested in the green (remember it from the before photos?), for the whole house, but we were really keen to give it a fresh new look. I’m sorry! But it’s worth it I promise. As you’ll remember from the post about our plans for the house, we lifted the house to make it two levels – controversial but this is something that most people do with these types of houses, particularly if you’re really space constrained like we were. As part of the planning approval for the house, we also had to a) move it backwards and b) create room for two car spaces on site, so as you can imagine the house looks quite different from the front now. But don’t worry! We kept virtually all the original features at the front, and also used a few cool DIY design tricks to make it feel fresh and new without it losing character. Phew! A bit of a balance to be struck but hopefully, you’ll agree it works when I share the after soon.

This was after the house was lifted, and we started to get a whole new perspective!


I loved this front door so much, so Ben and I worked hard to come up with a really fun DIY update that we recently did on it. We decided on colour and I can’t wait to share how and what we used.

It took weeks to get the 10 or so layers of paint (the door is original from 1870) off it, I enjoyed seeing all the different colours come through! It was the gobstopper of doors.

We’re keeping that sight line through the house, and even opening it up a bit more!
The Master Bedroom
This area of the house consists of the bedroom, walk-in wardrobe and ensuite, and it’s located in the back extended part of the house. First the extension was created, then the framing of the walls was put up and the electricals added inside the walls. Once they were done the cladding was put on the walls. We went with traditional tongue and groove cladding upstairs to reflect the heritage of the house. Another thing we spent a lot of time trying to get right was all the skylights on this left (south) side of the house, because this is the part of the house prone to dark and dreariness. For that reason, Ben developed a new roofline that included big long skylights and windows up high, which has created truly bright and beautiful spaces. Blinds will be essential though because you wouldn’t want to try to have a sleep in with those skylights!

Standing in the master ensuite.

Tfw the roof beams go up…

All my walk in wardrobe dreams come true!
Who DOESN”T want a walk in wardrobe? I mean come on. Ben did an amazing job of designing a space for a DIY walk in wardrobe, which I’m excited to share with you soon!


Let there be light!
The Living Space
The living space makes up the other side of the upstairs extension. The new roofline covers this area too, meaning it’s light and bright too. Sadly we had to pull out the old back wall of the original house to open up the space so it could flow as lounge – kitchen – dining – outdoors. It was sad to have to do that but there wasn’t any other way (and we’re using that old timber where we can in the rest of the build). To me this is the most exciting space of the whole renovation – it’s open and light and airy and exactly what the original house was lacking. Granted, it’s still quite small (remember the house was TINY to begin with) so we’ve had to squeeze a few functions into this space, but the openness definitely makes it feel bigger than it is.

Ben standing where the fridge will go 🙂

This is the wall we pulled out to open up the extension (sob!).

More roofline porn (if you’re into that?!).

Once that back wall came out.
Boys and their toys (or, in this case, ladders).


A kinda pretty mess.

‘So where should we go for lunch?’
-
Before the kitchen went in. - Before the kitchen went in.

-
We have some semblance of a kitchen! - We have some semblance of a kitchen!


Talking electricals.

Kitchen happening.
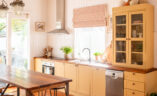
For the kitchen, Ben once again focused on designing something really cool that could be DIYed using really simple and affordable off the rack materials – with a few tweaks added to give a bespoke feel. I can’t wait to share the finished product!

Helooooo veranda.

Yes hi (Ben designed these panel window details for windows that were prone to harsh afternoon sun, I LOVE).
The Bathrooms
Anyone else get inordinately excited about bathroom design? *raises hand*. Turns out there’s just so much that goes into it – from details like baths, vanities and basins to tiles, paint and tapware. The world is your oyster! Ben and I chose to go with a pretty simple design, a few cool (DIY!) details that I’m hoping you guys will like. Once we decided on the design, the contractors went ahead and starting roughing in and waterproofing the space. Luckily we had great contractors and no issues arose around this – it’s not uncommon to have issues when the location of your piping doesn’t match where you taps and fixtures need to go.
-
Rough in happening. - Rough in happening.

-
Bath goals (coming soon). - Bath goals (coming soon).


Thanks for your tile tips people!

Material selection (more details here).

Something DIY and antique for the bathroom!
Downstairs
Stu-stu-studio! We ummed and ahhed about whether to build out the studio, the budget is pretty tight after after upstairs, but in the end we decided that we wouldn’t be renovating again for a while (even though Ben’s already got some new ideas hahaha) so we should do it now. Anyway, what started as a pile of dirt once we lifted the house was quickly transformed thanks to a gorgeous cement slab. Who knew a flat piece of cement could bring out such romantic feelings in me? Must be the hormones… Anyway, we kept the downstairs clean and modern to contrast a little bit with the upstairs, and I have to say it has turned out to be a really great space! It has a big open living space which would be ideal as an office, kitchen, two bedrooms and a bathroom.
-
Once the house was lifted! - Once the house was lifted!

-
Into a real life studio. - Into a real life studio.


Always feels so big before the walls go up.

So where should I put the craft storage? 🙂

‘Sushi? Bimbimbap? Tacos?’

Kitchen happening!

Garden looking soo pretty! NOt.
Anyway, as you can see things have been happening quite quickly, and I’ll be sharing with you soon the final spaces and along a seriously long list of DIYs that we’ve been working on. Wahhhhhh! I’m also busy building all the tips and tricks and hacks we used for this project to make it special and unique without breaking the budget… I truly love that we were able to do so many interesting, do-able things is such a small space, and without spending more than we planned.
Stayed tuned for more. Let me know if you have any questions about the process, as we’re more than happy to answer them.
Photos & Video By Nicola Lemmon, Myself and Ben McCarthy
Video Editing by Rosie Lord


