


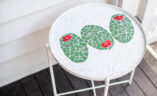
An upcycled desk for my studio. Anddddd with all the tiles. How good!
I have to say, this is a project I’ve been wanting to do for so long. It seems like everywhere I have looked recently has been inspiring me to completely cover something in tiles. And I finally got the opportunity when Bunnings asked me to pick something special to work on for their annual #DIYJuly, I just knew it was this I was going to try out. Read on for how I did it. You can also read my guide on Making Your Own Coloured Grout.


Choosing the desk
One thing that is important to get right is choosing the right desk to be the base for this project. I looked for a while online for the right style, and looked specifically for one that had sharp edges and simple lines which would mean a waterfall effect on the top and sides and a continuous feel to the tiles. I also needed to keep in mind the size of the tiles, but I actually bought the desk first and tweaked it a bit to make the tiles fit. You could also make the desk from scratch to the right proportions, or simply tile just the top of a desk rather than top, sides etc. Unfortunately the tiles were too wide at the bottom to fit perfectly all the way down to the ground, and I considered cutting them one by one to fit, but in the end I simply painted them the same colour as the grout.
You Need
- Decor8 Square Mosaic tiles
- Dunlop Tile Adhesive
- Davco Pre Mixed Tile Grout
- Taubmans Paint in Nutmeg
- Bunnings Sqaure Notch Adhesive Spreader
- Bunnings Tile Sponge
I also used two pieces of MDF, glue and a drill, but that was about modifying my table to make it perfect for the tiles.
How to
1
To me, the front sides of the table were very important to get right. And by that I mean that all the tile lines connected and the table looked symmetrical. I realised that down the legs was too narrow for a whole tile, as you can see the tile is significantly over the edge.
")
2
I decided to attach a piece of MDF to each side, which would widen the legs to the right width for a tile. I glued and then screwed this onto both sides.
")
3
You can see the MDF attached to the sides here. I also laid out the tiles to make sure they would fit properly without and significant overhang. By adding the MDF I also perfected the top of the table, so it fit the tiles well.
")
4
Next up! Gluing the tiles on. I used a square notch adhesive spreader to spread the glue on thick, then pressed the mosaic sheets down. I made sure that the gaps between the sheets mirrored the tile gaps on the sheets.
")
5
It was surprisingly fast to apply the tiles to the table! I did all the sides and it took about 1.5 hours. I used painters tape to keep some of the tiles on the vertical surfaces in place while they dried.
")
6
For the grout, I actually tinted the grout for this table myself using acrylic paint (read how to here), and it worked so well. This is a test I did, and I let it dry to make sure it dried properly with the paint added.
")
")
8
Once the grouting was complete, I cleaned the table as much as possible with the sponge to clean up all the grout. I then let it dry.
")
9
Once the grout was completely dry, I used a clean wet sponge to firstly fully clean any film of grout left over, then I polished it with a soft cloth. The paint and grout came off easily which was a relief. As the final step I painted the trim at the bottom the same colour as the grout.
")
Voila!

I loved working on this project, transforming an old desk, and it is honestly so satisfying seeing it in my studio.


To celebrate #DIYJuly and inspire your next project I have a $200 Bunnings voucher and a signed copy of my book to giveaway, all you have to do to enter is upload a DIY project you complete during July no matter the size to Instagram, include myself @genevavanderzeil and @bunnings in the caption and tag it #DIYJuly. I’ll be sharing my favourites entries throughout July, and can’t wait to pick a winner at the end of the month!

