


It’s bathroom weeeeeeeeek! One of the spaces I was sooo excited to get started on at our renovation was the bathrooms.
Not only because the original bathrooms were like a scene out of a horror movie, but also because my moodboard was overflowinggggg with ideas for bathrooms and DIYs that we could integrate. To create these spaces, we worked with Bunnings to supply the tap ware and bathroom fittings for the space, and I love how they turned out! So without further ado, I want to share with you the two upstairs bathrooms.

Watch the video
I had a lot of fun cataloging this space for video, I hope you enjoy!
Before
A picture says a thousand words, but a before picture says way, way more than that, right? In this case most of them relate to just how basic the tiny bathroom in the original house was. You can see the full before post here! Built in 1871 and barely any updates since then, the tiles were mis matched (years being being randomly replaced) the chip board walls peeling and the shower didn’t work.

(Sadly that blue free standing basin was cracked and couldn’t be fixed).


What we did
Ohhh so much happened to create two gorgeous bathroom spaces in the house. Check out all the plans for the house here.
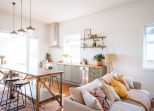
Raised and extended As you know, we raised and extended the house, and then located both bathrooms within the new extension. One is attached to the master bedroom, and the other is next to the mini laundry and is for the rest of the house.
Created more light A big priority for us was to create a light and bright home, so Ben designed some gorgeous sky lights in the bathrooms to make them really nice to be in. I loved seeing them being put in!
Decided on design and function One major decision we made was to keep both bathrooms the same in terms of finishes and look. I had considered making them completely different but for the sake of a consistent feel to the house and ease of execution they are virtually identical. The only difference was that for one of the bathrooms we wanted to have a bath.
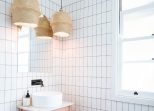
Chose timeless materials I had so many ideas for the tiles in the bathroom, some really out there and some a little more neutral. In the end we chose to go with simple subway tiles in a vertical layout, as well as this grey terrazzo look tile from Tilecloud. I think the final look is both on trend but also pared back and classic, meaning hopefully it won’t date too quickly. Thanks to everyone who helped us choose the tile pattern.
Picked quality fittings Fittings and hardware are also really important in a bathroom, which is why was worked with Bunnings to pick high quality pieces that were really affordable. From their Mondella range we chose basins, toilets and the bath, all of which were simple and minimal so they worked really well with the design. We used Mondella and Caroma tapware in matte black to give the space a really streamlined feel.
DIYed the Vanity I couldn’t find a ready made vanity for the space that I liked, we so chose to make our own out of vintage furniture. For one we used a vintage sewing table and the other we used a vintage marble to washstand. We then painted them and plumbed in the basin. More on this coming soon!
Added simple decor I think I mentioned how much I love arches, but because we couldn’t do them within the house, we decided to do them in mirror form in the bathrooms, and I love it! We also chose simple decor to add storage to the spaces, including a rattan bench and some timber stools. We also DIYed some rattan pendants for the space.


Putting in the sky lights. Let there be light!
-
The tiles and hardware - The tiles and hardware

-
Once the floor tiles went in. - Once the floor tiles went in.


All starting to come together!
And so, without further ado, I give you the bathrooms!
The Master Bathroom
This is the bathroom that’s attached to the master bedroom and is a bit of a little retreat away to one side of the house. I love it! For this one we chose to have a bath, something we’ll definitely use. Once again I integrated my favourite Haymes Paint Pink in the form of the vintage vanity and I think this does a great job of tying the house together.

In this photo: DIY bathroom vanity, Tile Cloud Tiles, Lumira products, Mondella mixer, Custom mirror, DIY rattan pendants.


In this photo: Mondella tap ware, Mondella bath, Tile Cloud Tiles, Lumira Products, H&M towel, Haymes Paint in Minimalist on walls.

With the lights flipped down!
-
Love this vintage marble top. - Love this vintage marble top.

-
All that light from the skylight - All that light from the skylight


A touch of luxury with some loverly Lumira products in the bathroom.

In this photo: Mondella toilet, Tilecloud tiles, DIY vintage vanity, The Bach Living Candle, Mondella Basin, H&M towel, Lumira products, Custom mirror, DIY rattan pendants.

Products in this Space
Mondella toilet & basin from Bunnings, Mondella Shower Head and mixer from Bunnings, Custom mirrors, DIY lampshades, DIY vintage vanity, Mondella bath from Bunnings, Tiles from Tilecloud, Haymes paint in Minimalist on the walls and Humas on the vanity, Stools from The Bach Living, bath products from Lumira, pots from Bunnings, Towel from H&M.
The Main Bathroom
The main bathroom is connected to the rest of the house, and once again we kept it really simple. This one has a shower and more big sky lights to give sooo much bright sunlight into the space.
In this photo: Tile Cloud tiles, Mondella shower head and mixer, The Bach Living wooden stool and rattan bench, Lumira candle, H&M towel.


In this photo: Mondella toilet, DIY vintage vanity, Mondella Basin, The Bach Living rattan bench.


Products in this Space
Mondella toilet & basin from Bunnings, Mondella Shower Head and mixer from Bunnings, Custom mirrors, DIY lampshades, DIY vintage vanity, Mondella bath from Bunnings, Tiles from Tilecloud, Haymes paint in Minimalist on the walls and Intimacy on the vanity, Stools from The Bach Living, bath products from Lumira, pots from Bunnings, Towel from H&M, Lantern from West Elm.
The fact that the spaces are matching really helped to reduce the costs of building the spaces, but I figure once I layer up the plants it will feel so nice and different!


