


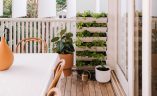
A few days ago I shared the reveal of our updated little back deck, complete with lots of plants and plenty of handmade touches. Unsurprisingly, you guys had sooo many questions about the plants in this space, particularly the ones that we’ve hung around the top of the ceiling. I thought it would be useful to share everything about them right here!
To be honest, I wasn’t 100% sure about hanging plants on the back deck, I was a bit worried it would make the space feel a bit too cluttered, or take away from that gorgeous, GINORMOUS fiddle leaf fig. But one day I came home and Ben told be he had bought some large hanging baskets online, so the decision was pretty much made for me! And you know what? I couldn’t be happier that we went with a ‘more is more’ approach to the plants in this space. It honestly makes me SO happy to wake up to this beautiful green house. Read on for how to choose, plant and care for hanging plants!

Before & After
You guys know I love a before & after, and I found these pics so knew it would be worth sharing it with you. The before photo is from mid November, and the after is from last week. What a difference a few months can make! You’ll notice also that the garden outside our deck got more lush and green from all the rain we’ve been having recently.


The Plants We Chose For Our Hanging Baskets
To choose the plants for this space we went to our local nursery, and chose ones that suited the light that this space gets. This is the western side of the house, so does get some hot afternoon sun, but generally it’s shady, especially with the addition of our pop out panel windows and battening all the way around. We therefore chose plants that would work in this space, so went with two Boston Ferns in the large planters, three Lipstick Plants and one Fishbone Cactus.
When we were buying the ferns I considered planting two in each basket, just because of the size of the baskets – they were huge! The woman at the nursery advised me to only put one in each, because of the beautiful shape that they grow into as they get bigger, which is best when you only have one per planter. She was SO right, something I can see now that they have grown more. So I would advise sticking to one plant per basket!

How To Plant Hanging Baskets
Materials for Hanging Basket Plants
- A Hanging Basket
- Potting Mix
- Coconut fibre liner
- Plastic bag
We got our hanging baskets from here,
and chose two 600mm size(essentially the biggest they had, and four 350mm ones. We bought coconut fibre linings to match.
How to plant hanging baskets
- Set up your hanging basket with the coconut liner inside. If your basket is round on the bottom, you can place it in a bowl or a pot to stand it up.
- Cut a piece of plastic and place it in the bottom of the basket. Use scissor to cut a few small holes in the plastic. This will stop the water running straight out.
- Place a few cups of potting mix in the bottom.
- Take your plant out of the plastic pot and softly break up the roots.
- Put it into the middle of the hanging basket.
- Add more potting mix all around the sides and on top of the roots and then press down.
- To help settle the roots, water your baskets a lot in the first day.
To hang them, Ben attached hooks into the ceiling, making sure to attach them into the ceiling battens/joists.


How to Water Hanging Plants
When it comes to planting a hanging garden, the biggest consideration is how you are going to water them. Hanging plants dry out much faster than plants in the garden or plants in pots, so being able to water them consistently is key to having a thriving garden. I worked out that these plants would need to initially be watered everyday, and then once they had settled in it would need to be every second day. To begin with I stood on the table and watered them with a watering can full of water each. This took so long and was quite backbreaking work too. Unsurprisingly we were on the look out for another option!
After much thinking, we decided to set up irrigation for these plants, connected to the irrigation system for our home. Our garden has a really great irrigation system, and Ben’s dad was kind enough to come over and run some irrigation piping up the side of he house, and along the top of each side of the deck. From that, each plant has its own pipe that is staked into the soil of the plant, with a dripper attached to give a nice even flow. I didn’t like the look of the irrigation system when it first went in, and I considered painting the piping white like the walls, but the plants have grown really fast and disguised them a lot so you barely notice them anymore.


The system is set to water the plants every second day for five minutes. This happens early in the morning which is the best time to water the plants. I also bring my indoor plants from out and put them underneath the plants, as water often leaks out of the hanging baskets and creates the perfect watering system for plants down below. When we go away I leave the indoor plants there so they get constant watering. I’ve noticed my indoor plants all starting to thrive with this regime too!
The woman at the nursery told me a good idea is to take your hanging baskets down every year and soak them in a big tub of water, swhich apparently rejuvenates them!


Here’s what the space looks like now!


