


You guys know how much I like displaying photos at home, and I’m always looking for new and interesting ways to do it.
Recently I came up with the concept of creating a rainbow wall hanging using cardboard, with cute little hanging photo frames made from cardboard. I really like the idea of using what you have on hand, and who doesn’t have an old cardboard box?

For this project I got to try out Canon’s new SEPLHY square photo printer. It’s seriously easy to use because you can connect it directly to your phone and print using the SELPHY Photo Layout app. Read on for the tutorial!
MATERIALS
- Canon SELPHY Square Photo Printer (or printed photos).
- Recycled cardboard
- Scissors and box cutter/Stanley knife
- Hole Punch
- Three Colours of yard
- Rope or Raffia
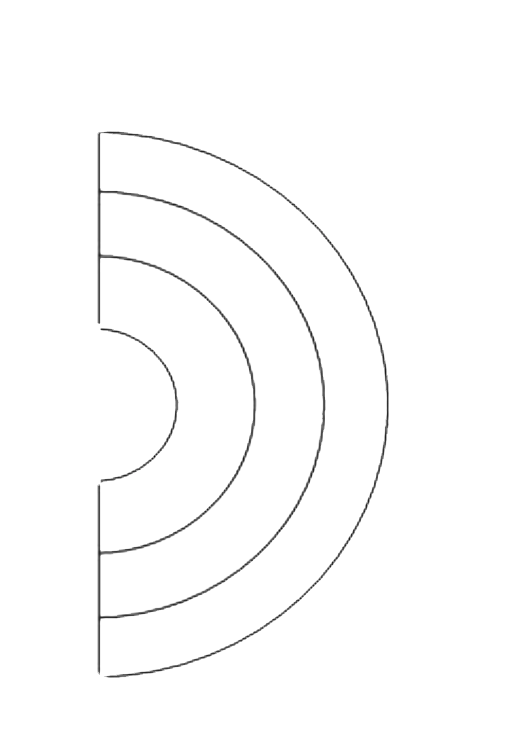
- Rainbow to print. You can download me rainbow here.
If you’re interested in buying a Canon printer or SELPHY, they have given me a 10% off code to share with you guys. Just use the code ‘Gen10’ to get 10% off.

HOW TO
- Print and cut out your rainbow template. Stick it onto the cardboard.
- Carefully cut the rainbow out of the cardboard, and use the Stanley knife to cut the inside lines out.
- Now it’s time to wrap each layer of the rainbow in yarn or thread. Tie a piece of yarn on at the back and carefully wrap it around. This will take a little bit of time so it’s good to do it while watching a series or listening to a podcast. When you get to the end of a piece of yarn, tie a new one on at the back. Do all three layers this way.
- Print your photos, and then make little cardboard frames to stick them on to. Add holes on the top and bottom of the little frames.
- Make the fridge for the bottom of the rainbow by punching holes along the edges and tying on raffia or rope.
- Finally, tie it all together using raffia or rope, and then hang it on the wall!


This project is in collaboration with Canon.


