


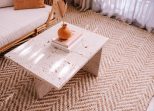
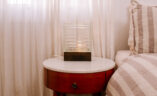
The Smashed Tile Table has got to be one of my favourite projects to date and it challenged me. But in the best possible way!
I have to say, the transformation from where this humble little table started to where it ended up is pretty dramatic. Which is very fitting because the drama with this DIY was there the whole way along. So many twists and turns, so much changing my mind (Who? Me?! Never!). But every twisty turn was part of the fun and I couldn’t love this table more.

You need
- Table to upcycle (This is a secondhand one from Super Amart that I found on the side of the road)
- Marble Tiles
- Rubber headed mallet
- Drop cloth
- Glue
- Wide Joint Grout (I used Mapei GG)
- Wood trim
- Saw
- Wood glue (I used Selleys Aquadhere)
- Painters tape
- Small wood nails
- Something to clean off the grout (I used my Dremel Versa)
- Paint for the legs (I chose a blush colour)
Picking your Tiles
For this project, I was really lucky to be able to find some sample stone tiles that a marble shop was throwing away. So take a look in secondhand stores, recycle shops or even ask interior designers you know as they always have samples they don’t use. For me, using stone has a nice effect because the breaks are less sharp than using ceramic tiles, but ceramic tiles still looks nice too and are easier to come by.
How to
1
First things first, choose the tiles you want to use. I chose a mix of marble tiles in black, white, grey and blush to achieve the look I wanted but you could use whatever colour combination you like.

2
Using a rubber headed hammer, smash your tiles into smaller pieces. Remember to place a drop cloth over them before you start to whack to protect the tiles and yourself.

3
Because my table had slits in it, I added a piece of plywood on top. This created a nice flat surface for your tiles to stick to. If your table is already flat you wont need to do this.

4
You can then start to place your tile pieces. I began by lining the outer edge to create a nice clean finish around the edges. Then I filled in the rest of the space, first with bigger pieces and then smaller ones to fill the gaps.

5
Once are happy with how you have laid out the tiles, it's time to glue them down. Take each piece off individually and glue one by one to ensure you keep your layout the same. I could have spent all day playing around with the layout but once its in a good place - just walk away.

6
Next its time to frame the outside. Mitre cut your trim pieces to the lengths of your table. I found it worked best to glue them on then add painters tape to ensure it didn't move while adding some small nails to secure it. I used a really thin nail so it didn't split the wood.

7
Using painters tape, tape off the wood so its protected from the grout. Mix your grout using the packet instructions. After some testing of colours I ended up using the taupe colour. Smear it all over the top ensuring all the gaps are filled and let it dry. Make sure you remove the painters tape before the grout dries so it doesn't get stuck!

8
Before the grout is completely dry I scraped as much off the surface of the tiles as I could. Then once they're dry, they'll need a really good clean! I poured a little bit of water over the tiles and cleaned them off using my Dremel. It worked really well and made them shine!

9
Next its time to paint the legs, in the end I went with a blush colour. Give the wood a light sand and prime then paint on your chosen colour. Ben also came in at the last minute a chopped off the bottom of the legs to make it shorter which made it look so much better! You may not need to do that depending on your table.


