


Welcome to the first project in my new upcycling series, #foundthenflipped! Over the next month I’ll be coming to you with 4 easy upcycles that take simple pieces to anything but, using inexpensive materials from Bunnings. First up? This mid century inspired cork side table.
One of the things that I find often is basic laminate furniture that’s dying for a refresh. There are so many options out there but I have been really into mid century materials – warm wood and cosy cork, so I decided to use cork tiles to give this piece a full makeover. Coming in at under $70, I felt like this project is a really affordable and effective way to completely change the look of a piece!
Also, if you’re after a chatty vlog of this process, you can watch the first video in the series over on Tiktok here and here.

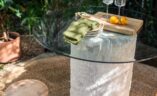
Before & After


The Inspiration
I’ve been noticing cork everywhere for the last year or so, and I was so excited to finally get a chance to use in in our space! There are lots of cork products you can use to do DIYs, Bunnings have a thinner adhesive one that would be great for some projects, but in the end I went with a cork tile which is thicker and I think has a better feel.

Project cost: $70. Project time: 3 Hours
Materials
- Cork Tile From Bunnings (I used 3 packets)
- Liquid nails
- Stanley Knife
- Jigsaw (optional)
- Gold Spray paint
- Tape
How to make an upcycled cork side table
1
The first thing I did was plan the design of the layout of the cork tiles. To do this, I played around and decided a kind of brick style pattern would look the best (aka a 'running bond'). I then used a ruler and pen to mark out the pattern.

2
I then used a heavy duty Stanley knife to cut the tiles to the right sizes. I found that it's best to do a number of lighter cuts for the most clean finish of the cut. You can also use a jigsaw to do this but I found it to be cleaner with a Stanley knife.

3
In the end I decided to do a pattern of one larger tile and one smaller in each section to make it feel a little more patterned and less like a checker design which would feel out of balance in some areas.

4
I then applied Liquid Nails (construction glue) to the table, and starting laying out the tiles. got a few wrong so I had to pull them off and reposition but that seemed to be fine!

5
For the top, I thought it would be better to cut them to size once they were glued onto the top, so I just decided on a pattern and glued them straight on.

6
I used a jigsaw to cut the tiles, for the back I used a ruler clamped not to get a straight line.

7
For the front I just cut them freehand with the jigsaw, using the edge of the table as a guide.


9
For the top edge, I really loved an inspiration image I saw that had a brass edge, but I couldn't find any nice thick brass so I just cut some MDF and sprayed it gold.

10
I then used tape to glue the 'brass' edge on. I also cut thin strips for the sides of the table too. I could have done a 'brass' edge for the legs but decided to make the top edge the focus.

Voila

I feel like this is a great option to do for when you want to refresh a laminate piece, and this idea could have a lot of different applications.


Tune in every week for the next month to see another #foundthenflipped project!
This project is in collaboration with Bunnings.
