


I’ve been thinking about giving the girls’ room a refresh for a while now, and with DIY July here, I decided to start by making them some scalloped wardrobes.
When we originally installed our Kaboodle kitchen wardrobes (we actually hacked some pantry cabinets), we selected the raw board doors, which means you can paint them yourself. At the time we just gave them a coat of varnish, but I’ve always felt like they would be really great with something a little extra. Like scallops! I’m always looking for cute scallop trim here in Australia, and I was so excited when I realised I could use wooden coasters from Bunnings to create an easy scallop! I simply laid some MDF strips over the top for the cutest panelled look. I just love how this turned out, and the girls are obsessed.


Interested in how we hacked some pantry cabinets into wardrobes? Read all about it here.
Materials
- Round Coasters
- Liquid Nails
- Gap Filler
- Primer
- Paint and paint brushes
- MDF cut down for the trim
- Gold hardware from Kaboodle
How to Create a Scalloped Wardrobe
1
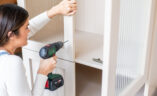
I started by removing the doors from the cabinets and then removed any stickers and sanded the doors to remove pen markings. Next I lined up the round coasters along the edge of the doors to make sure I had them spaced properly, making sure that the two doors lined up with each other. I found marking the centre of the door helpful as my starting point.

2
Once I was happy with the placement, I secured each coaster in place using Liquid Nails.

3
Once they were dry, I cut some MDF to make a trim around the outside of the wardrobe doors. I measured the depth of the trim to make sure that it covered half of the coasters creating the scallop effect. I secured the trim down using liquid nails.

4
Because of the placement of the coasters, I decided to have a thicker trim along the bottom of the wardrobe

5
Next I filled in thee gaps on the side of the trim with some gap filler and once that was dry sanded it back ready for painting

6
For the paint - I started with a coat of primer. I needed to use a brush over the coasters to make sure I evenly painted in between the scallops, and then a roller for the main part of the doors.

7
Then it was time for a couple of coats of my chosen colour. I used British Paints Wollemi Pine!

8
Once it was dry, I decided to attach some new hardware from Kaboodle and then reinstalled the doors!

Voila
Such an easy refresh that completely transforms a wardrobe!


This post is in collaboration with Kaboodle Kitchen.
