


")
If there’s one thing I love, it’s a makeover! Recently I posted the before and after from a refresh I did at my brother’s house in his bathroom, and so I thought it would be fun to share a few more details here!
My brother has been thinking about renovating his place for a while, but has decided to put it off for a little longer. Which is why I offered to help give their space a little freshen up… I mean, I do love a challenge! I really wanted to see if it was possible to update an old bathroom without totally tearing it apart. To me it’s which is important, because a lot of the time a big renovation isn’t feasible, whether that’s because you’re renting, live with your parents or don’t want to throw all your money at the bathroom (literally, down the toilet haha). Through this process I was so happy to find that it’s easy, and very quick, to update an old bathroom into something functional and pretty. Full disclosure… My brother’s pink vintage bath kinda stole the show here.
")
Before
")
")
Step 1. Clear it out
A declutter is as good as a holiday… That’s what they say, right? Maybe not, but either way, it is so much easier to give your bathroom a glow up after you’ve ditched anything you don’t need. If you’re like me, the bathroom can become a halfway house of products, gadgets and other things that you are unlikely to use. So get rid of whatever you can! In this case, my brother and his wide are fairly minimalist anyway so we didn’t need to get rid of much, we just removed some of the wall storage they had. Check out my decluttering guide here!
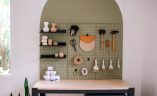
Step 2. Upgrade the storage
Speaking of storage, I knew straight away that my brother’s bathroom could do with an update to the wall storage. But to be honest, I was a little daunted about drilling into the tiles. Which is why I was happy to discover Tesa’s range – they have loads of different accessory options that all use an easy to install (and easy to remove!) adhesive wall mounting system. All with no drilling required, making them perfect for renters or if you want a quick update. I shared how to I put this shelf up over on stories! Watch the full step by step video here.
Step 3. Upgrade the bathmat
I’m going to make a big call here – I think bathmats are a massive missed opportunity in most bathrooms. Often they serve a purely utilitarian function, and aren’t that pretty to look at. But the reality is they sit there, out in the open all day and night, and in fact they’re a great way to bring some texture and design into your bathroom. They can also serve to disguise not-so-nice tiles! I added a Beni Ourain inspired one to this bathroom in keeping with the neutral tones, I also didn’t want to outshine that pink bath.
Step 4. Coordinate your towels
Nothing says luxury more than coordinated towels and hand towels… For me, it’s the definition of adulting. These days I’m all about bamboo waffle towels, they are just SO soft and they last forever. Opting for white or striped styles is a great way to make sure your towels appear to be coordinated, even when they aren’t.
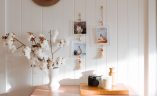
Step 5. Ceramics, bottles, candles & art
It’s all in the details when it comes to the bathroom, which is where ceramics, candles and bottles make a big difference. The best part is, you probably have whatever you need for the bathroom around the house. I swapped out the toothbrush holder for a small vase that I found in my brothers kitchen (I like to go through people’s cupboards while they are out LOL) and added few tea light candles they had in the house. Bar soap is a great, and sustainable, option and adding a nice ceramic dish to hold it beside the tap is a nice touch. I also picked up a small line drawing that I had at home and hung that. Just because it;’s the bathroom it doesn’t mean you should skimp on the artwork!
Step 6. Add a few plants!
Honestly? If you do one thing in your bathroom to make it a more enjoyable space to be in, make it adding a few plants. They honestly transform the space. Try to image these ‘after’ pictures without plants in them and you’d probably find the space pretty blah. Now add the plants in and you can see that they make this bathroom sing. Check out which plants are best for your bathroom here.
After
")
")
")
")
")
")


