


")
The day has finally arrived for me to share my upcycled tiled table project.
I feels like a momentous occasion, mainly because I’ve been working on this project for months now (on and off) and I have to say, it’s one of my favourite upcycles to date. I’d been wanting to test out a tiled table project for a while, and truth be told, I didn’t really know how to tile when I first started, but through this process I’ve learnt so much! It took a while to work out the best tiles to use, how to paint them, how to get the perfect surface and so much more.
")
The Before & After
I actually found this table when I was walking down the street! It was during my suburb’s annual curb side clean out, where everyone throws away furniture they don’t want anymore. I was so pleased to come across this gorgeous table, that looked nice and sturdy for this project. I lugged it home on my own, so I have to say it’s been a labour of love from the start.
")
")
Materials I Used For This Upcycled Tiled Table
For the tiled table
- A sturdy table
- Johnson Tiles 97mm x 97mm satin finish tiles
- 60cm x 120cm MDF sheet (plus screws and drill)
- 3mm tile spacers
- Davco Tile Glue
- Dunlop Ultra White Tile Grout
- British Paints Bright White Ceiling Paint
For the painted tiles
- Megatreat Liquid Terracotta
- Rustol-eum Clear Spray
- Foam brushes
Watch the Video
I put together a video for you guys to see how I made it, I learnt a lot from this process! This video explains everything you need to know and adds a few tips and tricks so make sure to watch.
How to tile a table
You can see a full run down of how I made the table and some of the things that I learnt in the video above, so I highly recommend that you watch that! Here are a few photos of the major steps that I took along the way to get there. I have to say it was an involved process but honestly, I’ve never felt so proud of something in my life. I’ll be sharing a more detailed how to for painting tiles in the next week or so, because it was a bit hard to get into that in this video! Stay tuned for tips on that.
- Before: The table I found on the road.
")
- 1. Cutting the legs to around 40cm coffee table height.
")
- 2. The perfect height!
")
- 3. I decided to screw on a piece of MDF to the top for a perfectly flat surface.
")
")
")
")
")
")
")
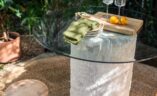
Voila!
")
Tips for Your Own #Uptiled Projects
I learnt so much through this process so wanted to share a few tips for you to make it easier.
- When choosing a tabletop to do this on, I suggest that you find one with the right dimensions. You want evenly spaced tiles, and personally I think it looks better if you don’t have to cut any tiles. Either choose tiles to work with your table top, or find a table that is the right dimensions for the tiles (and spacers) you’ll be using. This table was 60cm x 120cm (24in x 48in), and each tile and tile spacer added up to 10cm (4in).
- I ended up adding a sheet of timber (MDF) on top of the table so that I had the perfect surface, but you can obviously skip this step if you like! Ben thought that the tiled would come up if the surface wasn’t flat, which is probably true and although it was an extra step I’m glad I did it.
- I did the grouting by hand and found it quite easy. A few of you mentioned that the grout can be quite hard on your hands but I didn’t think it was too bad. Gloves would be better for next time though!
- If you’re doing a big table, consider using bigger tiles.
- When choosing your table, consider that it will need to hold the weight of the grout and the tiles so it needs to be quite sturdy.
")
I’m so excited to set this table up on my veranda! I’m doing a little refresh to the decor of the space and this table will be perfect.
")
")
")
")
")
")
")


