


I’ve been eyeing off designer lampshades for a while now so when I worked out how to make a fluted lampshade myself I couldn’t wait to get started! And you’ll never guess what I used to make it…
It started out with some lamps I found at Vinnies – they had great shape and were in good condition they just needed a little bit of fun added. I decided to take inspiration from a neoprene skirt I made years ago. Remembering how I constructed it gave me a framework for how to make a fluted lampshade. I toyed around with a few ideas of what sort of fabric to use in order to transform the shade into a fluted design and finally decided to use a roller blind. Yes a roller blind! I knew the stiff fabric would be perfect for creating those rounded shapes and I was hoping it would keep its shape really nicely. Read on for how I did it.


Materials you need to make a fluted lampshade
- A lamp – find something that you like the shape of and that has a wire lamp shade in good condition
- A white roller blind
- Scissors (I love these fiskers ones)
- Hot glue gun and glue sticks
- A marker
- Scrap cardboard
- A piece of string
- Paint – I used my trusty terracotta paint

How to make a fluted lampshade
1
First, take your lamp shade off and cut your fabric so all that remains is the wire base.

2
Next, you'll need to create a template out of cardboard. I played around with a rectangle shape on a piece of paper cutting the sides in a little at a time so one end was smaller, until I had the right shape. I then cut that out of a scrap piece of cardboard. The shape I ended up with was an isosceles trapezoid.
then used my template and a marker and drew the shape over and over onto the roller blind and cut out a heap! The amount will depend on the size of your lampshade.

3
Once I had everything cut and my hot glue gun had heated up I glued them together. I determined which side of the blind was going to be on the outside and placed one piece on top of another, right sides together. I then glued down one side and once the glue was dry I folded them out and curved them over to reveal the shape I was hoping for. Now it's time to repeat repeat repeat. I had done a whole bunch of them I pulled it all out and held it together in a circle shape to test over the lamp. I added a few more and when I finally had the right amount I glued the start and end together. If your curves are being pulled too much you'll need more or if its too big to sit on your lampshade you'll need less.

4
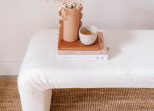
With all the pieces together I wanted to add some extra stability and ensure that the curves would sit exactly how I wanted them so I turned the shade upside down and used a hole punch to create a hole between each curve. I did this about 3cm down from the top. Just make sure you're putting the holes where the glue is so you don't see it on the outside. I then used a piece of string and threaded it through all the way around and tied it. This really helped the whole shade to sit perfectly and to make sure the curved fabric didn't 'relax' and stretch out. Finally, the lamp base got a fresh coat of terracotta paint and the whole thing was done.


I honestly couldn’t be happier with how this turned out. I love it so much and I’m tempted to make more! How many fluted lamps is too many fluted lamps?


