


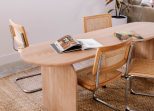
I’ve been wanting a console table for the studio for a while, but haven’t really wanted to spend hundreds (or thousands) of dollars on it. So, of course I was going to try to make one!
A midweek stop in my favourite demolition yard yielded a $10 slimline wooden door, and after thinking for a little bit, I realised I could make a console table using it! But what to use for legs?! Once again the Bunnings landscaping department came to my rescue with $1.79 cement pavers. A coat of terracotta paint, a little bit of creative stacking and here it is!

MATERIALS YOU NEED
- Old door (really any type of slimline panel would work)
- Cement pavers
- Paint (I used terracotta paint)
- Liquid nails
HOW TO MAKE A PAVER CONSOLE
1
I began this project by painting the cement pavers with a terracotta paint. I'd suggest using a roller and then doing any touch ups with a small paint brush.

2
While the cement pavers were drying I decided to also paint the door with that same terracotta paint. I contemplated painting it a different colour. But I decided using the same colour would create a more cohesive look.

3
Once the cement pavers were fully dry, I went ahead and applied the liquid nails to one side.

4
Most of the inspiration I pulled for this project just stacked single pavers on top of one another for the legs, you could definitely do this. However, I decided to stick together three pavers to create one large cube. I felt like this added a bit more detail and dimension to the design.

5
After the paver cubes had dried, I measured the correct distance my two console legs would need to sit. Then, I spent some time playing around with how I wanted them stacked. Once I was happy with the way they looked I stuck them all together with some more liquid nails.

6
After the cement pavers were stacked I added a bit more liquid nails to the top paver cube and popped on the painted slimline door.


A layer of paint, some glue and some creative stacking and here it is! Seriously easy and with a total cost of $52 I couldn’t be happier.
Looking for more unique DIYs? You might like one of these!
This project is in collaboration with Bunnings.


