


I’m so excited to share with you one of my favourite projects, easy polymer clay earrings.
With Christmas right around the corner, perhaps some of you are thinking about presents to buy for friends, or maybe you just want to spice up a simple outfit. Well you’ve come to the right place!

As you guys know, Sculpey polymer clay is one of my favorite mediums, and I’ve been using their Soufflé collection for the last few years for so many different projects. I made this wall hanging for me and this one for Frankie. I also made some very simple fridge magnets. And I recently experimented with Liquid Sculpey. In truth I’ve been wanting to make earrings from this clay for a very long time, and recently I finally got a chance! As soon as my friends at Sculpey told me they were launching a new Midnight Blue shade, I knew I had to use it! Read on for how to make your own.


You need
- Sculpey Soufflé polymer clay. I used Midnight Blue, Igloo, Cinnamon and Pumpkin.
- A rolling pin or glass bottle
- Clay cutters or various sized lids
- A scalpel or sharp knife
- Earring posts and earring backs
- Jump rings
- Jewelry pliers
- Glue
- Raffia for the tassels (optional)
- Baking tray and baking paper
How to make clay polymer earrings
1
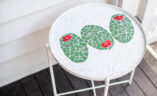
Start by finding a clean, non porous surface, I used a marble table but glass would also work. Roll out your clay using the bottle or rolling pin to around 4mm thick, I suggest not rolling it too thin for this.
")
2
Using your cutters or lids, stamp out shapes and then peel off the remaining clay. Using the knife, cut out semi circles for some of your clay shapes.
")
3
Place them on the baking tray and bake on a low heat oven for 15 minutes, or until when you press your nail into the clay it doesn’t leave an imprint. Remove and let cool.
")
4
Now to make up the earrings! There are two options for putting holes in them, you can either use a small hole punch, or use a small drill (I used my dremel). Lay out your jewelry pieces to decide your design, then drill holes where you want to connect the pieces together.
")
")
")
")


