


I’m all about using what I have around me to create my Christmas decorations, and upcycling old packaging is one way to do this, with a little extra spice and flair thanks to my beloved Cricut.
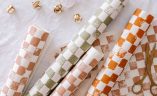
As you know, I love to do paper crafts, but sometimes it’s a bit hard to do more detailed designs by hand, so I was excited to use my Cricut to make some decorations – it’s the most amazing cutting machine and makes this a breeze. For this project, it’s really just about looking at what you have around the house to work with. I always find that I have loads of cardboard and paper that I have collected. I also found some British Paints paint chips that I was finished with that I thought could work too! I then added raffia and Cricut Gold Shimmer Vinyl.

You need:
- Cricut Maker 3 Machine
- Old cardboard, paper and cardstock (or paint chips, I love these from British Paints)
- Cricut Strong Grip Mat
- Cricut Permanent Smart Vinyl in Gold Shimmer
- Raffia
- Glue Stick


Creating My Design
To choose the designs for this project I looked through the Cricut Design Space Image Library to find the right shapes, it was super easy to pick out the ornament shape. The umber for this one is #M8205376. For the tree, I simply made this using three different sized triable that I welded together. I then just duplicated the shape on the canvas so the Cricut would cut a number of these at a time, I did around 15 for each cut.
How to
1
Start by selecting and setting up your design in the Design Space app. For the thicker cardboard I used the knife blade to cut it, and for the cardstock (aka paint chips) I used the fine point blade. Then, cut up your cardboard into pieces that will fit the mat.

2
I then set up my cardboard on the mat. I added tape to secure it down and so that the smaller pieces wouldn’t flip up and get caught in the machine. I then selected ‘make it’ and the machine cut out the designs.

3
Once the machine was finished cutting, I removed the excess cardboard which left over the flat trees and ornaments. I then went back and cut out the same designs onto the Gold Shimmer vinyl.

4
To assemble the ornaments, I simply folded them in half and then glued them together, usually in a set of 3 or 4 pieces per design. To the basic cardboard ones I added the Gold Shimmer on top first, and then added a strip of gold shimmer along the edges to give them a more clean look (and cover the cardboard).

5
Finally, I added a raffia tie so that these could be hung on a tree or as a garland.

I love these little ornaments, and making them was a breeze with the Cricut, I can’t wait to make more!


In Australia, you can find the Cricut Maker 3 and Foil Transfer Kit at Spotlight or Harvey Norman.
This project is in collaboration with Cricut.


