


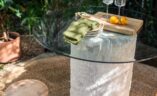
I’ve had this old laminate table sitting in my studio for so long. It’s brown, it’s not that cute, the laminate is in bad condition. It all screams: upcycle!
Luckily I love round tables and I’ve been wanting to recreate some of the beautiful pedestal tables I’ve been seeing everywhere lately made from concrete, plaster and stone. I was able to remove the metal legs from the table top and knew all I needed next was to find a cylinder or cone shaped base. My next step was obviously to walk the aisles of Bunnings as I so love to do. And what do you know, I found the perfect base – a bin! Read on to see how I completely transformed it to make this upcycled pedestal dining table!


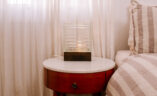
I spent a bit of time planning this project and deciding what was going to work both aesthetically but also practically. I would have loved the whole thing to be plastered but I knew that wasn’t going to work for a table top that I want to keep in the studio and work off or eat lunch off! So I decided to tile the table top instead (you know how much I love tile!). I kept everything white so there was consistency in colour amongst the changes of texture between the plaster and tile. I have to say, I’m so glad I went down that path because I love how it turned out!
Materials You Need For an upcycled pedestal dining table
- Old table to upcycle or just a round table top
- Garbage bin from Bunnings
- Plaster (I used Easy Flow Compound)
- Fibreglass joint tape
- Sandpaper
- Penny Round tile sheets
- Tile adhesive or liquid nails
- Tile Grout
- Grout float
- Tile sealer
- Rubber or
- plastic gloves
- Edging (I used MDF and cut into strips using a jigsaw)
- Wood filler
- White Paint
Making an upcycled pedestal dining table
Making the base
A note that when you are selecting a bin to use as a base for this project, I suggest you get an industrial strength one that is very sturdy. I can sit on this bin without any change to its shape, but other bins with thinner plastic wouldn’t be able to hold my weight so I would check this before selecting the bin. If you are nervous about the strength of your bin, you could fill it with concrete or with something else to give it more structure.
1
The first thing was to get the base covered in compound. Because the bin is plastic, I thought the compound may not stick very well so I started by covering the bin in fibreglass joint tape to give it something to adhere to. The tape has a sort of grid pattern to it which gives a nice gritty texture for plaster. I simply cut the tape into strips and stuck on.

2
Next it's time to plaster the bin. I smoothed it on and then made sure to work back and forth horizontally. The bottom of my bin has a small lip which is great for extra stength but I wanted it to blend, and also create more of a cone shape, so I filled it with compound and smoothed it out. With each layer of compound I added a little more to the lip area and eventually it was a smooth transition. It's important to wait until the plaster is completely dry before adding another layer and remember to always give it a sand before adding more on top.

3
Once the plaster was dry, I attached the base to the table top. You can actually plaster the base after attaching it to the table top, but I did it this way. Take two thick planks of wood (thick enough to bring the height of the table to ideally around 730mm - 750mm) and screw them into the underside of the table, located in the centre where the bin will connect with both.

4
Turn your bin upside down and screw it into the planks of wood from the underside. Ideally use a size of screw that will go through the wood planks and into the table (without going through to the other side.

How to make a tiled round table top
5
The first step is to glue the tiled to the table top. You can use tile adhesive but I used liquid nails. I started with a sheet right in the centre of the table and worked out from there.

6
The key to a nice finish with this sort of tile is making sure each sheet lines up. I suggest taking your time to line up the sheet on all sides and not rushing through this step. Only add glue as you are ready to stick. Once the tile is down there is a little wiggle room to slide the sheet around and make sure its positioned perfectly.

7
Once you get to the edges you can cut the sheet and remove the overhang. At this stage, I kept some tiles at the edge and once all the tile was on, I went back and did a final trim to make sure it was nice and neat. For some of the larger gaps I used a tile nipper to cut the tiles to fit into the gaps on the edges, but I knew that because I was using a matching coloured grout that the gaps on the edges would be filled in and wouldn't be too obvious. If you're using a contrasting grout, I suggest you do as many cut tiles as you can.

8
Next, this table needs an edge. If you're able to find furniture edging then you could use that or laminate edging, or even make it out of metal. I had some ply already so decided to cut it into strips to use as edging. I measured the table edge plus the height of the tile.

9
I glued the edging on and immediately taped it over just to ensure it didn't move at all while the glue dried. Once dry, I used wood filler to fill the gap between pieces.

10
Once the glue and wood filler were dry, I tape off the tile and painted the edging all white using outdoor paint that's water resistant. You could also choose to paint the edging before you attached it and then just touch up once its on.

11
When the paint is dry, it’s time to grout over the tile. I used my hands with gloves to gently push the grout into the gaps, working in a circular motion. I then used the grout float to smooth it all over to a really nice finish. Once it’s smoothed out try not to touch it or go over it again as you can risk making dints or marks in it. Leave it to dry overnight (or as outlined on the grout packet).

12
When the grout has dried, take a wet sponge and ring it out, then clean all the grout off the top of the tiles. Finally, I sprayed a grout and tile sealer over the whole table top to ensure it was waterproof and it was something I would be able to clean really easily each each use.

Voila

I hope you enjoyed the tutorial for this upcycled pedestal dining table! I truly love how it turned out, even though there was quite a few steps along with plenty of twists and turns.


This project is in collaboration with Bunnings.