


Ever since I got a Cricut, I’ve been wanting to personalise an event using this handy little machine. I’ve always loved the little details that make events feel so personal and elevated, and I’ve wanted to try this sort of thing myself. Fast forward two years and I finally got the chance in the form of a friend’s baby shower!
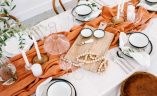
It was so fun to create something special for her, and it was so so easy! Professional looking signage and decor like this could cost you an arm and a leg but I did this whole event for under $100. I made placemats, a sign, a cake decoration, drink stirrers and place settings. I was a bit nervous how to would turn out so I decided to set it up in the studio today to get some pics, ahead of the big event this weekend! Naturally I had to make a cake – it was delicious!

What tool do I turn to when it comes to creating professional looking and customisable decorations? If you guessed my Cricut machine then you’re 100% right. I had a very specific aesthetic in mind for this event and I knew Cricut would be the best option to help bring my ideas to life. With the Cricut Design Space app, I was able to find the perfect font and shapes that I wanted to include in these decorations.
How to Create Your Event Designs
A key part of the process is working out what design you want to cut. That’s where it’s useful to draw up a plan. I actually used the Design Space canvas to map out all the different elements I wanted for the event. It really helped me visualize it! This is also the part where you can tailor whatever you create to your personal aesthetic or that of your event. I just created shapes to match the size of the signage and other elements I wanted, and then designed words to match. It made it so easy! Here’s the designs in the app.
A big element for a nice look is also about choosing a good font. The app has sooo many fonts, some of my favorite fonts in Design Space are Cochin, Bodoni, Annlie, Happy, Kate’s ABC’s and Parisian Std Regular, but there are thousands to choose from in the app depending on your project. I used Caslon Black for this one.
Another thing it is useful to do is make a plan about the colors you want to use, on your signage and with any vinyl you plan to use. You can use the Design Space app to visually plan out the colors which I found really helpful.

How I Created My Event Elements
The items I created for the baby shower all used very simple methods, similar to other projects I have done where I have used vinyl or card. Here’s an outline of each one.
Arched Sign & cake sign
I’ve seen so many cute signs similar to these on Pinterest and I was dying to recreate a few for this event. I simply used MDF board for the sign itself, which I cut using my jigsaw. Then I painted them and then designed the wording using the Design Space app. After that I cut out the design and transferred it to the boards using transfer tape.
Placemat
To really personalize the event and make sure everyone there felt extra special, I decided to make arched placemats with some wording on them. I used a similar process to making the larger arched sign.
Seating Cards
For the seating cards, I used a method of cutting words onto card in an arched shape. I used coloured card so that when placed on top of the white place the words would show through. I originally was going to do something smaller for the seating cards, but I ended up loving the look of the cutout words and decided the half circle on top of the plates was a fun touch!
Drink Stirrer
Because I know the bottomless mimosas will be a hit (virgin mimosas for the baby mama), I decided to make some personalized stir sticks with the initials of each guest. This was such a simple project that I think is a really sweet detail for the event. I used acrylic disks for the top, a cut skewer for the stem and then cut out the initials with my Cricut Machine. To make it look seamless, I mirrored the vinyl and placed the letters on the underside of the acrylic.


I’m so happy with the way everything turned out and I can’t wait for the real thing! If you have a special event coming up that you’d like to have those little details that make things that much more special, then I would highly recommend getting your hands on a Cricut Machine!
Voila!


Project Q&A
I posted this onto Instagram a few days ago and had so many questions about it! So here’s a quick recap of some of the most frequently asked questions about this project:
Q: What font did I use for this project?
I used the font ‘Caslon Black’ from the Cricut Design Space app. They have heaps of other great options too!
Q: Was the vinyl easy to stick to a painted surface?
I had no problems sticking the vinyl to a painted surface, you just need to make sure the surface you’re attaching the vinyl to is nice and smooth. I used a semi gloss paint to paint the signs.
Q: Could you achieve the same with the other Cricut models?
Yes! These decor items use very simple methods, just vinyl or cutting cardboard. So these projects could easily be done on any make of Cricut machine.
Q: How much did the decor cost?
The whole set of decor for this project cost about $100 in total to make the whole thing (including paint, MDF, vinyl). I realised after someone asked me this that the flowers cost more than the decor haha.
Q: I want to buy a Cricut, which model is the best for event/interior decor?
I’ve used the Cricut Joy and the Cricut Maker models. The Joy is a smaller version and great if you’re just wanting to dip your toe into the world of Cricut. But for bigger projects like this one, I used the Cricut Maker 3 Machine. It’s really flexible in terms of cutting lots of materials and being able to do longer and wider cuts. That being said, you could do this project with the Cricut Joy, but it will likely take a bit longer and be less efficient than if you used the Cricut Maker Machine.
Q: Where did you find the daisies for the cake?
You could use regular flowers and just cover the stem with foil. But I used edible flowers from Basilea.


If you’d like to learn more about how to use the Cricut Design Space app, you can view a more detailed blog post about it here!
This post is in collaboration with Cricut


