


Who’s ready for another dollhouse update? Today, I’m sharing all the details about the wallpaper.
Where did I get up to last? I gave the dollhouse a detailed clean with my Dremel, removed the lace curtains, tore off some of the old wall paper and pulled up the blue felt carpet to find a beautiful light pine wood floor underneath. I also replaced some of the flooring with stained popsicles sticks (worked better than I thought it would) and finally found the perfect colour to paint the exterior! If you missed my post about this, you can find it here.
Keen to learn more about dollhouses, you need to check out my new dollhouse course!

Deciding The Layout
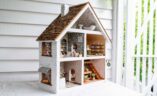
The first step for working on the inside of the dollhouse was working out the layout, ie which room would go where. This was a tricky process because the rooms are all quite small (in a ratio sense), and so different to what my usual home style would be. I ended making what would be a bedroom the kitchen, the entryway was made into a dining room and the living room ended up being quite small but that was fine! On the second floor, I decided to turn what would be a bedroom into a bathroom, and use the original small bathroom as an office. In the attic, I made a last minute decision to create an art room because Frankie absolutely loves art so it felt right.
Applying The Wallpaper and Board & Batten
I have to admit, I didn’t love the original wallpaper in the dollhouse. I knew it wasn’t going to compliment or go with style of furniture I had in mind, and it was quite faded and sad looking. I also knew that by make a statement with the walls it would immediately make the whole dollhouse look great.
I gave painting one of the rooms a go, but it was really difficult to make it look good and ended up looking a bit underwhelming as it was sooo fiddly – and messy! So instead I opted for wallpaper!. I first tried printing wallpaper I found online, but this ended up being a bit blurry and the size of it just didn’t look quite right. So I was pretty stoked when I found this book of printed card stock at Spotlight, for only $14.

How I applied the Wallpaper In the Dollhouse
When I looked up dollhouse wallpaper methods I found soooo many different ways to do it, but honestly I just got started. The most important thing I think is to make sure you apply it without any bubbles. If you can do that, it will look amazing!
You need:
- Mod podge
- Wallpaper (you can buy wallpaper for dollhouses, print your own, I used this)
- Foam paintbrush
- Scissors
- Metal ruler
- Craft knife
- Sealant
How to apply dollhouse wallpaper
- Measure the walls using your ruler to measure the height and width of each wall in your dollhouse. Make note of any windows or doors that will need to be cut around.
- Using scissors or a craft knife, cut the wallpaper to size. Be sure to add a little extra length to each piece to allow for trimming.
- Using a foam paintbrush apply a thin layer of mod podge to the back of each piece of wallpaper. Be careful not to get too much glue on the front of the paper as I found that made the colour run.
- Hang the wallpaper starting from the top, and apply each piece of wallpaper to the wall, smoothing it down with your hands. It’s important to get rid of all bubbles so it’s a good idea to work from the middle to the outer edges.
- Use a craft knife to trim the edges of the wallpaper to fit around windows and doors.
- Repeat the process for each wall in your dolls house, working from top to bottom.
- To protect the wallpaper, you can apply a clear sealant over the top using a sponge or paint brush (but I decided not to).
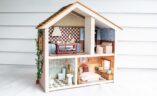
Because I felt like the wallpaper alone in every room felt a little too busy, I decided to made some board and batten for a few of the rooms using plain card stock and popsicle sticks. I used mod podge to attach both the wallpaper and board and batten pieces. I think this really helped to give the house a lot of detail!


I’m honestly so happy with how this wallpaper turned out. I feel like it gives the dollhouse the playful and whimsical look that was dreaming of in my head!


Stay tuned for some furniture making!

