


I’ve been obsessed with cottage core aesthetic lately and all the dollhouses I’ve been making have only been making me more obsessed, so I felt it was time to add a little cottage core our house.
I already love a good scalloped piece of furniture or decor but I know how hard it can be to cut curves… Until I remembered I could use the Cricut to cut the curves for me, which makes this project so fun and easy. And really, anyone can do it. It’s craft meets upcycling – my kind of project! I also decided that since I’d have some new shelf space that I needed some updated styling things to add to them too, so I had some fun decorating some frames and boxes to add some extra detail.


Creating the Design
I began by creating the design in Design Space. First I made the scalloped design and then some basic shapes for the styling items I wanted to add. The thing I love about this kind of project is it’s all based on really simple shapes and designs and then colour is what really makes it come alive. That means this process is so quick and simple. I added a scalloped shape from the shapes section and dragged it to the right size to fit my shelf. I then found some stripes and patterns in the image section and I was ready to go.
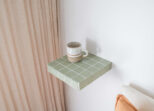
Making the Scalloped Shelves
The scalloped bookshelf is something I’ve been wanting to do for a while and if I’d known how simple it was going to be I’d have done it a long time ago. The best thing about using a Cricut to do this is you can cut the scallops to the perfect size and shape so there’s no awkward edges or half scallops to work out.


You need:
- Wooden Shelves
- Cricut Maker 3 + knife blade
- Balsa Wood Strips (these are 2mm, you can also you chip board or basswood)
- Painters tape
- Cricut Strong Grip Mat
- Liquid nails
- Paint
- Roller, brush and tray
- Wood filler and spatula
How to
- With your design ready to go, start by taping a piece of balsa wood to the strong grip mat on all sides. This will ensure it doesn’t move at all in the cutting process. I made my scallops in two pieces and joined them once on the shelf. My shelf was 880mm wide so I cut two 440mm pieces for each shelf.
- You can then insert your mat and press play. You’ll need to repeat this process until you have enough pieces for your shelf. I used 10 in total over 5 shelves.
- Once cut, you can glue the balsa wood onto each shelf, being careful to line everything up and keep it all straight. I used liquid nails for this because it dries quite quickly and is really strong.
- Once the glue is dry, use some wood filler to fill the gap between the two pieces of balsa on each shelf. Once dry, give it a light sand to make it flat and smooth, so you can’t see where the join is.
- Next up, give the whole piece a primer coat. This is especially important if your shelf is raw wood or a dark colour.
- Finally, a couple of coats of paint in your chosen colour and you’re done. Just remember to cut in with a brush in the corners before coating with a roller.
Making a striped frame
I wanted to add some fun detail to some frames for my bookshelf and had the idea to try decorating not just the frame but the matting as well for a more custom look. It turned out to be really simple and looks really effective!


What you’ll need
- Cricut Maker 3
- Picture frame with Matting
- Cricut Smart Vinyl
- Cricut weeding tool
- Spray paint
How to
- With the stripes all ready to go in design space, insert your Smart Vinyl into the Cricut and press play.
- While cutting, I spray painted my frame and matting in a cream colour so it had a nice neutral base.
- Once cut, you can carefully remove the stripes one at a time and place them on the frame and matting. I left the glass under the matting while I stuck them on so that the matting didn’t move around.
- I began by placing a stripe on either end, then one in the middle. Then one in the middle of each of those spaces and so on. This ensures all the stripes will be lined up evenly.
- Side note, normally I would use transfer tape to perfectly place stripes on. However because I painted my frame I didn’t want to peel any paint off, so this method works really well for that.
- Once all the stripes are on, you can remove the glass from the back, cut the stripes through the centre and fold over all the edges.
- Replace the glass, add a cute pic and your adorable striped frames are ready!
Making a Patterned Trinket Box
Something I always love to have in my styling is a little box to hold treasures or mess! I had a wooden box in the cupboard so I pulled it out and it was so easy to completely change the look with the Cricut.


You need:
- Cricut Maker 3
- Smart Vinyl
- Cricut Weeding Tool
- Cricut Transfer Tape
- Cricut Scraper Tool
- Small box
- Paint and paint brush
How to:
- Begin by painting your box in your chosen colour and set it aside to dry.
- With your pattern chosen in design space, insert the Smart Vinyl and let the Cricut cut out the pattern.
- Once cut, use the weeding tool to remove the excess vinyl.
- Cut a piece of transfer tape the same size as the pattern, remove the backing and place it over, pressing firmly to make sure it is completely stuck down.
- Peel the transfer tape up, allowing the pattern to come up with it.’
- Now you can place your pattern over the box and press firmly with the scraper tool. Carefully peel off the transfer tape off.
- Repeat on all sides of the box and you’re done!
Once all my pieces were done I had the fun job of styling my new shelves with the fun things I’d made plus some other books and vases I already own. Every time I walk past this shelf it makes me smile, it feels so happy and playful, I just love it.


After

This project is in collaboration with Cricut.
