


I love doing projects with and for Frankie, but I must admit, I think this one takes the cake.
Frankie, like most 4 year olds, loves the playful and colourful world of Peppa Pig. I’d been tossing around the idea of building some sort of play area in the back garden for a while now, so when Frankie recently watched Peppa’s clubhouse episodes and fell in love with the idea of having her own clubhouse for her and her friends to play in, I figured this would be a really fun project that I know the girls will love!

Designing the Clubhouse
To create this Peppa inspired clubhouse in my back garden, I decided to enlist the help of my partner Ben! He’s so helpful when it comes to bigger projects like this and I always love having him around to bounce ideas off of. We decided to build the clubhouse from scratch in the back corner of our garden, and both agreed to go with a really simple design with a sliding door, small window, and a deck off the side that would allow lots of space for make believe fun and games.
If I’m being honest, my initial idea was a lot more more low key than this, but when you have a designer and a perfectionist on the job, it shows. Here’s a PDF of the plan we created if you’d like to print it out and use it yourself.

Building The Clubhouse
When building the structure of the clubhouse, we first built a flat deck section in the garden and then we created a frame using secondhand timber. We ended up needing to dig into the ground a bit and used a couple of pavers to make sure it was level as our back garden has a bit of a slant to it. To clad the outside, we had some plywood spare so it was really simple to just cut it into strips and nail it directly onto the frame. To make sure the play house was “little legs friendly” we ended up adding a timber step in front of the deck which we had left over from the other steps in our garden.


The building portion of the clubhouse was actually a lot easier than I was anticipating, but I have a feeling it would have taken a bit longer without the help of Ben!
Painting The Clubhouse
I was so excited to decorate the club house and add some colour. For the base, I used the British Paints 4 Seasons Low Sheen Exterior paint in white (same paint as I used on my fence). I love this product because the primer is mixed into the paint so I can just skip that step.


Two layers of paint later, I was ready to add the flowers! These were super simple to make and I think they’re my favourite part of the clubhouse. I simply painted these wooden placemats from Bunnings using the same 4 seasons paint from British Paints and used Liquid Nails to hold them together. Once they were fully dry, I attached them to the clubhouse with my nail gun.


Decorating The Clubhouse
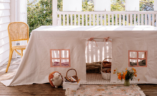
Now for the best part – decorating the inside! We painted the interior white because I thought the colours from all the toys and odd and ends would fill up the space with enough colour. I’m glad I did this because I love how much the colours pop against the white walls and I feel like it would have been a bit overwhelming if we decided to go with another bright colour. To keep the cost down, we found the majority of the odds and ends that go inside the clubhouse at my local thrift store. I wanted these pieces to encourage the girls to play with their imaginations and create the feeling of this being their little house, restaurant, castle, or whatever they decide they want it to be that day. These pieces included a few little stools, a tea pot and tea cups and some simple figurines and vases.


I cleaned and painted these pieces using the same fun Peppa inspired paint I used for the flowers (‘My Favorite’, ‘Fizzy Pink’ and ‘Hot Pop Blue’). They turned out SO CUTE!
Voila


To finish things off, I filled it up with some seriously cute Peppa toys (including a mini Kids Only Clubhouse!) What I loved most about this project was the fun, colourful and playful aspect to it all. I was able to select colours that I love but don’t usually have the chance to use and the freedom to play around with design ideas that I wouldn’t normally use indoors.


Seeing the look on Frankies face was worth every minute spent on this project. She loves it and can’t wait to show her kindy friends. I’m so excited for this to be a space for her to have adventures, friendships and mishaps, just like Peppa.
If you have a little Peppa Pig super fan of your own, you can now win your own Peppa Pig inspired wonderland including a customisable cubby, paints and amazing toys, by entering the Save The Children Australia raffle here!
If you enjoyed this post, then you might also like these!
How Yo Make A Kids Arched Desk
This project is in collaboration with Peppa Pig.

